
In order to link your PBX system to our PLUGVOIP service you will have to create a trunk. To do this, once you access your PBX via IP address, select the tab PBX in the main menu bar at the top and then select the option to settings in PBX from the second menu bar. After that, select the option Trunks to the left and there you'll be able to create a SIP trunk.
From there you will be able to configure the following options:
Before learning more about this subject, fill out the form below to contact Telephone Systems Services and find out about the best VoIP solutions for your company to reduce costs and increase productivity.
Trunk Name: Descriptive trunk name, in case of SIP trunks you can use whatever name you prefer (plugvoip for example).
Outbound Caller ID: The valid caller 10-digit identification number you will pass with this trunk for outgoing calls.
Trunk Name: The trunk name you will configure, for SIP trunks you can use whatever name you prefer (plugvoip for example).
User Context and User Details: Leave these fields blank.
Peer Details: In this field use the following information:
canreinvite=nonat
nat=yes
context=from-trunk
host=sip.plugvoip.net.br
secret=*****
type=peer
username=100000 (numero da conta)
disallow=all
allow=ulaw
; allow=g729 (se possuir a licença da Digium)
fromuser=100000(numero da conta)
trustrpid=yes
sendrpid=yes
insecure=invite
qualify=yes
Register String: In this area, define the following information:
numerodaconta:suasenha@sip.plugvoip.com.br:5060
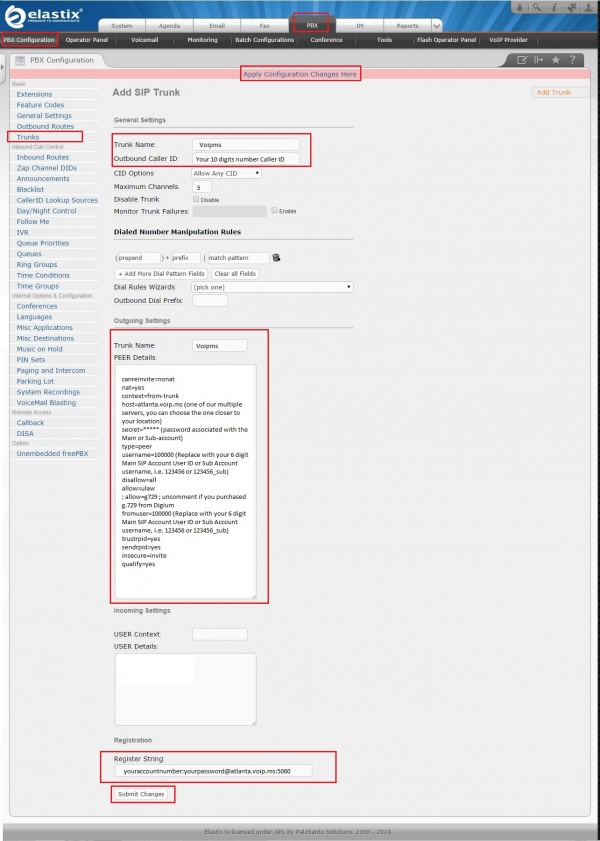
Once you have configured the trunk, Click on the button Submit Changes at the bottom of the page to save the settings and then click on the option Apply configuration changes here in red at the top of the page in order to apply the settings for the PBX system.